Every person needs to store some type of information on their computer. This information can be classified information or something which he or she wants to share with others. When it comes to sharing the information there are many ways to do so. One option is to share this information by something called network drive.
Now, What is This Network Drive? Why It’s Useful?
 According to Google, this network drive is nothing but a type of computer drive which is installed as well as operated by a computer network. Mostly, a local area network (LAN) is used. With the help of this drive, you can share the same information across all or selected users on the network and also provide the same data storage and access to services and it acts as a standard disk drive.
Most of the time this technology is used in a corporate network. Many times you need access to the customer or the company information which you may get with the network drive since all of the employees need the same information and it makes their job easier rather than storing the information on a local drive.
This technology is very beneficial when you want to share and store the same information to and for many people. Being a central storage location, it is easier to backup. The problem is if the network goes down the drives are inaccessible as they solely run on a network. The network drive is not only used in corporate networks, but also used in personal homes. Since this drive solely functions on network, you can use it to access the same information on a different device. It is easier since you don’t have to turn your computer on and off again for some information when you can access it on some other device.
How to Set up a Network Drive?
Building a network drive is quite easy. To begin with, you can use a normal external hard drive which will plug into your router via a USB connection or you can also use a wireless hard drive that will emit its own Wi-Fi signal that can attach to your home network. The aim is to find your own IP address. When you use a regular hard drive, which connects into your USB port, you sign into the router’s firmware, using a particular IP address. If it doesn’t work, you can easily find it. After doing so, you open a command prompt in Windows and then type ipconfig. Then, try looking for an entry for “Default Gateway”. You’ll see a number and this number is the router’s IP address.
Next, the drive gets customized. When you’ve logged into your router, try looking for an entry meant for USB storage. This serves as the drive where you can edit settings and set up a password so it is accessible. After making the required changes, save it and exit from the router’s firmware.
When you choose to use a wireless hard drive you need to make sure the drive is fully charged or at least running on external power. Follow the instructions which are given on the instruction manual so you can set up the wireless connection to the drive from your device. If you want to change the name of your drive or set passwords, then it is required to install and open a software for your drive. After following this process, you can use it on other drives. You are able to create folders, copy and also move files from the drive. Only after this will the drive be active and ready to use by other devices in your house.

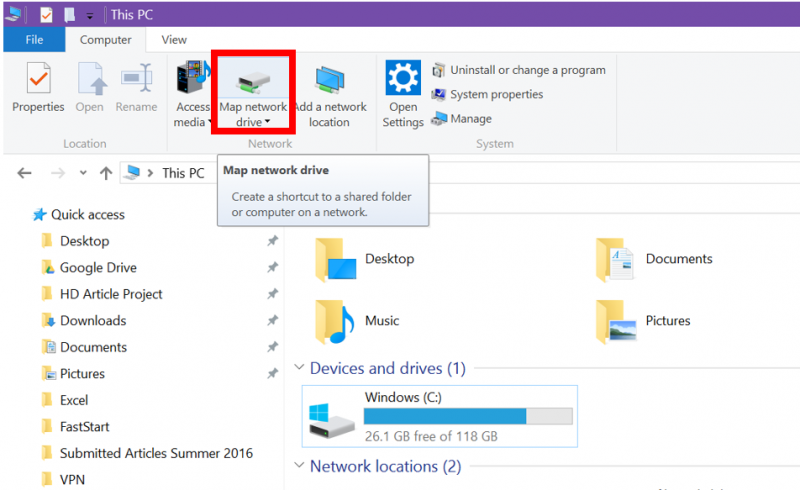
If you want to map a letter to a specific drive, you can open File Explorer and select “this PC” or “computer” and then click on “Map network drive”. You can finalize information to specific drives by this method. You can have access to these specific drives by clicking on a new drive letter which is located in the File Explorer or Windows Explorer. With this, you can view and also work on those files which are secured in network drives.
The main purpose of mapping drives is nothing but to associate a local drive letter with a shared storage area to some other computer over a network. It is meant to have permanent access to a folder which resides in some other computer. This system makes our work easier as many a times a situation occurs where we need access to a folder for some information which is on some other device that is not present. Network drive makes it possible to access that information easily just through a network.
Network drives make it easier to share information stored in files without using any computer resources. Since these drives have enough capacity to store large amounts of data, it makes it a lot easier to access a larger amount of information with minimal efforts and no computer resources. It’s also beneficial to edit the kind of data which needs to be done frequently since it just needs network to function and the edited information is stored on all the other devices connected.
The above steps shown are solely based for Windows and not for iOS systems. You can still connect your iPhone to various network drives. Ensure that both your iPhone and computer which is hosting the network drive are connected to the same Wi-Fi network. This is because they function on the network. Then take a note of your computer’s IP address and download and install Temporality or File Explorer free on the App Store and then launch the app on your iPhone.
Since network drives make sharing files easier, it has gained a lot of popularity and is widely used. Networks are easily available which is one of the key reasons for its wide usage. You also have a feature of granting access to selected people or devices which is like a permission slip which helps maintain privacy. Due to these excellent features, network drives are popular.